Observing DOM elements using MutationObserver JavaScript API

Full-stack web developer and technical writer. Interested in anything computer, and write about tech, programming, and other related stuff.
If you find this article useful, I have a YouTube channel that's currently just growing at the time of writing this article and need supporters like you to subscribe. You can check it out here.
Introduction to Mutation Observers
When creating web applications, you might sometimes need to detect changes made to the DOM tree. Maybe you want to know when an element gets removed, when an element gets added or when some other changes occur in the tree, the MutationObserver object is meant for this. It allows us to detect changes made to the DOM tree and react to them through a callback function.
The MutationObserver Object
The MutationObserver object is a built-in javascript object which makes it possible to observe DOM elements and text nodes for changes and react to the changes by firing a callback function. It was created to replace the deprecated MutationEvent Object which provides us the same functionality but through an event-driven interface.
Using the MutationObserver object
To start getting reports of changes made to an element, we first need to create a MutationObserver instance and then use it to observe the wanted Node on the DOM tree.
const observer = new MutationObserver(callback);
The observer is created using the new keyword and the MutationObserver() constructor function. The constructor function takes a parameter which is a function that gets fired whenever a new change has been detected on the specified Node. We’ll discuss the callback function later in this article.
To observe a Node on the DOM tree with the above observer, we use the observe() method the MutationObserver instance which initiates the observation process and reports detected changes.
observer.observe(target, options);
The observe() method takes 2 parameters. The first parameter is the Node to observe. This can be either an element or a text node. The second parameter is an object which contains options that will determine how and what the observer should observe on the node.
Available Configuration Options
As said earlier, the options parameter that will be passed to the observe() method should be an object containing key/value pairs that configure the observer. Each key in this object should have a boolean value (except for attributeFilter which should be an array) and can only be one of the following. Note that all boolean values default to false except in certain cases which will be discussed below.
subtree: If set totrue, observe not justtarget, but also all nodes which are descendants oftargetfor the specified change to observe.childList: If set totrue, monitor thetargetfor addition and removal of child nodes. Ifsubtreeis alsotrue, monitor bothtargetand it’s descendants for addition and removal of child nodes.attributes: If set totrue, observe changes to the value of attributes ontarget. Ifsubtreeis alsotrue, monitor bothtargetand it’s descendants for changes in their attribute values.attributeFilter: An array of attributes to be monitored. This will make the observer not to monitor attributes which are not present in the array. -attributeOldValue: If set totrue, store the previous value of the changed attribute(when observing changes in the value of attributes of the monitored nodes).characterData: If set totrue, monitor target for changes in its character data. Ifsubtreeis alsotrue, monitor bothtargetand it’s descendants for changes in their character data. This applies to text nodes.characterDataOldValue: If set totrue, store the old value of the changed character data(when observing changes in character data of the monitored nodes).
To avoid errors, make sure to abide by the following:
- One of
childList,attributesorcharacterDatamust be set totrue. - If
attributeFilteris set orattributeOldValueis set totrue,attributesmust not be set tofalse(It defaults to true in this case if it’s not set). - If
characterDataOldValueis set totrue,characterDatamust not be set tofalse(It defaults to true in this case if it’s not set). Let’s create a sampleoptionsobject which we can pass to theobserve()method.const options = { childList: true, characterData: true, subtree: true } observer.observe(node, options);
The options passed to the observe() method above will make the observer give a report when;
New nodes are added to node or any of its descendants.
Existing nodes are removed from node or any of its descendants.
There is a change in textual data of node or any of its descendants provided that node or the descendant is a text node.
The Callback Function
As said earlier, the MutationObserver constructor receives a parameter which is a callback function that is called whenever a change is reported from the observer. The callback function receives 2 parameters. The first parameter represents the change that was detected and is passed to the function as an array of MutationRecord objects. These objects describe the changes detected and have properties which can be read to know about what type and where the change occurred. The second parameter passed to the function is the observer that called the function (In case you’re using a single function with multiple observers.
The MutationRecord Object
The MutationRecord Object represents a change detected by an observer. One or more or instances of this object are passed as an array to the callback function specified in the MutationObserver() constructor when a change is detected. It has the following readable properties.
type: The type of change that was detected. This can only be“childList”,”attributes”or”characterData”.target: Where the change took place. This is always a text node iftypeis”characterData”and element otherwise.addedNodes: A list of added node(s). EmptyNodelistwhen no node was added.removedNodes: A list of removed node(s). EmptyNodelistwhen no node was removed.previousSibling: The previous of the added / removed node(s). Returnsnullotherwise. -nextSibling: The next sibling to the added node(s). Returnsnullotherwise.attributeName: The name of the changed attribute. Returnnullotherwise.attributeNamespace: The namespace of the changed attribute (for XML).oldValue: The previous value of the changed attribute or characterData. Set only when -attributeOldValueorcharacterDataOldValueis set totruein the object passed to theobserve()method of theMutationObserverinstance. Always null whentypeischildList.
Using the MutationObserver Object To Detect Addition And Removal of HTML Elements
In this example, we will be setting an observer to monitor a <ul> element for changes in the number of it’s child nodes (<li>s). Initially we will define 2 <li> tags as the child nodes of the <ul> and then make some changes to the number of <li>s in the <ul> by setting the contenteditable attribute of the <ul> to ”true”. This will make the content of the <ul> to be editable just like an <input> element.
Let’s take a look at the HTML. This snippet shows just the <ul> and it’s child nodes. You can wrap <html>, <head> and <body> around this if you want to follow along.
<ul contenteditable="true">
  <li>Tongue</li>
  <li>Eyes</li>
</ul>
Next, we have to get the <ul> element in our javascript and set an observer on it.Let’s get the <ul> element and also create the observer.
const listElem = document.querySelector("ul");
const observer = new MutationObserver(function(mutationRecords, mutationObserver) {
  // We handle the change here
});
Remember that the first parameter of the callback function passed to the MutationObserver() constructor is an array of MutationRecord objects. In this case, we used mutationRecords as our first parameter and mutationObserver as the second parameter which represents the observer that called the callback function. As mentioned earlier, this is useful if you are using a single function for multiple MutationObserver instances.
Now we need to define the options which will be passed to the observe() method of the observer. After that, we attach the observer to the <ul> element which we stored in the listElem constant.
const options = {
  childList: true
}
observer.observe(listElem, options);
Setting childList to true makes the observer monitor the <ul> for changes in its child nodes. Let’s go back to where the observer was created. We need to specify what happens when a change is reported. For now, we’ll get the type of change and if type is ”childList”, we get the addedNodes and removedNodes too. We then log everything into the console.
const observer = new MutationObserver(function(mutationRecords, mutationObserver) {
  mutationRecords.forEach(function(mutationRecord) {
    const { type } = mutationRecord;
    if(type === "childList") {
      const { addedNodes, removedNodes } = mutationRecord;
      console.log(type, addedNodes, removedNodes);
    }
  });
});
Since the mutationRecords parameter will be an array of MutationRecord objects, we have to first loop through the array then access each MutationRecord object. Here we used the forEach() method. Also, we got the value of mutationRecord.type, mutationRecord.addedNodes and mutationRecord.removedNodes using object destructuring. Writing const { type } = mutationRecord; will give the result of writing const type = mutationRecord.type;. You can read more about object destructuring here.
We are now all set. Anytime we add or remove <li> element(s) from the <ul>, the observer fires the callback function. The result looks like this before we make any change.

When we make a change that causes a new Node to be created, something is logged into the console.

And the console looks like this
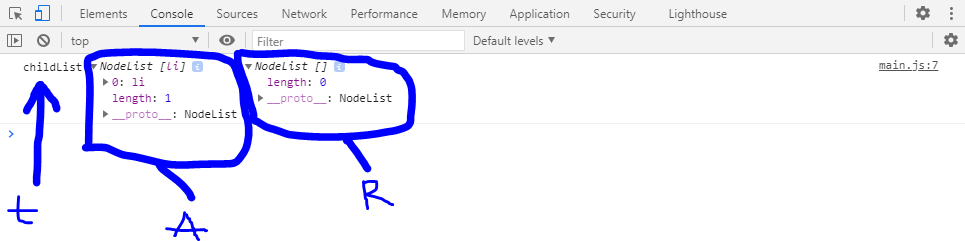
The t in the image above represents the type, the r represents the removed node(s) and the - a - represents the added nodes. As you can see, the value of the length property of the added nodes is 1. This is because I have added a new <li> to the <ul> by hitting the Enter button. Also, the length of the removed nodes is 0 because no node was removed.
This is very useful since we do not have to bind some sort of event listeners to each <li> element in the <ul> to detect changes. Even if we wanted to bind event listeners, there’s no way we can attach an event handler to an element that has not yet been created since we allow users to create new elements by setting contenteditable on the <ul> to true. Using the MutationObserver API makes it easy to handle situations like these.
Let’s explore the API further. We’ll be making some modifications to our callback function. Let’s assume we want the user to complete the list of the 5 sense organs and there are 2 <li>s already each containing a sense organ. Whenever the user modifies a value or the user creates a new <li> element, we’ll check if the currentValue is correct(is one of the 5 sense organs) and if the user is not exceeding 5 <li> limit.
We start by modifying our options object. This time around, we want the observer to listen for changes in the descendants of the <ul> because we need to detect changes in the text value of all the <li> tags. Therefore, subtree and characterData have to be true.
const options = {
  childList: true,
  characterData: true,
  subtree: true
}
Next, we have to specify the list of sense organs to validate the user input against. I set this in an array.
const senseOrgans = ["NOSE", "EARS", "TONGUE", "EYES", "SKIN"];
Next in our callback function, we check if the type of mutation change detected is ”characterData” which means that the value in one of the <li>s have been updated. If so, we get the current value and check if it exists in the senseOrgans array. If it doesn’t exist, we add a custom error class to the <li>. In this case, I used ”error”.
const observer = new MutationObserver(function(mutationRecords, mutationObserver) {
  if(type === "characterData") {
      const { target } = mutationRecord;
      if(!senseOrgans.includes(target.data.toUpperCase())) {
        target.parentNode.classList.add("error");
        return;
      }
    }
});
Note: Here, we used target.data because the value of target is always a text node if type is ”characterData” and you can access the value of a text node through the data property. Also, to get the <li> whose value is changed, we access the parentNode property of target because the <li> will be the parent of the text node whose value is changed. We then add the ”error” class to the <li> if it’s inner text isn’t one of the sense organs. The includes() method checks if the senseOrgans array contains the given data. Bear in mind that we converted the data to uppercase because the items in the senseOrgans array are also in lowercase.
This is just a simple usage for the MutationObserver API. By the way, I created a full implementation of the example above on YouTube and you can watch it below. You can also view the source code here.
It’s also possible to stop an observer from detecting changes. This is possible with the disconnect() method.
observer.disconnect();
There’s also the takeRecords() method which returns a list of changes that have been detected but are yet to be processed by the callback function of the observer as an array of MutationRecord object(s). This is useful if you want to disconnect the observer but you need to process all pending changes. In this case, you just have to use takeRecords() to get the list of pending changes and then disconnect() to stop the observer from doing its job, then process the changes gotten.
const pendingRecords = observer.takeRecords();
Thanks for reading. If you like this post, you might want to follow me on Twitter @abdulramonjemil


